CONTENUTO ►
In questo articolo vedremo come collegare il modulo HR911105A Ethernet Shield ad Arduino. Quando si progettano meccanismi autonomi o si crea un sistema domestico intelligente, molte persone potrebbero aver bisogno di collegare la scheda Arduino al modulo di rete LAN/Ethernet ENC28J60. Ciò consentirà di controllare Arduino attraverso una rete locale utilizzando un computer o uno smartphone (se è disponibile un hotspot Wi-Fi).
Per questa attività sono necessari:
- Arduino Uno / Arduino Nano / Arduino Mega
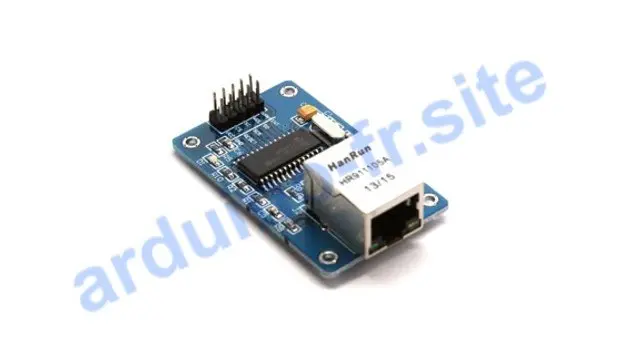
- HanRun HR911105A Ethernet Shield
- LED e resistenza
- breadboard
- cavi di collegamento
- libreria EtherCard.h
Modulo ENC28J60 Ethernet Shield datasheet, pinout
Per aiutarvi in questo compito, abbiamo preparato delle istruzioni passo-passo su come collegare ENC28J60 (HanRun HR911105A) al microcontrollore Arduino Uno / Mega 2560. Imparerete quali sono i connettori a cui si collega il modulo HR911105A e vedrete il codice per far funzionare insieme la shield Ethernet ENC28J60 e Arduino. Seguendo le istruzioni passo-passo, sarete in grado di controllare l’illuminazione a LED via LAN utilizzando un computer.
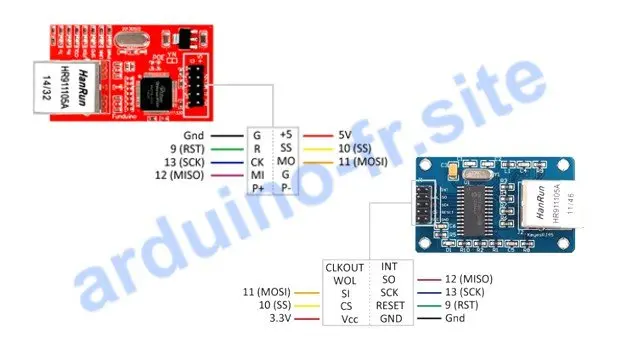
Collegare la scheda Arduino e il modulo HR911105A come mostrato nella foto seguente. Si noti che il modulo di schermatura Ethernet ENC28J60 a 10 pin (HR911105A) è alimentato da un connettore a 3,3 V, mentre il modulo a 12 pin è alimentato a 5 V. Inoltre, le denominazioni dei connettori sullo schermo HanRun HR911105A possono essere modificate dal produttore, ad esempio ST invece di SO. Il collegamento dei fili ai pin deve essere di buona qualità.
Come collegare modulo ENC28J60 Ethernet Shield
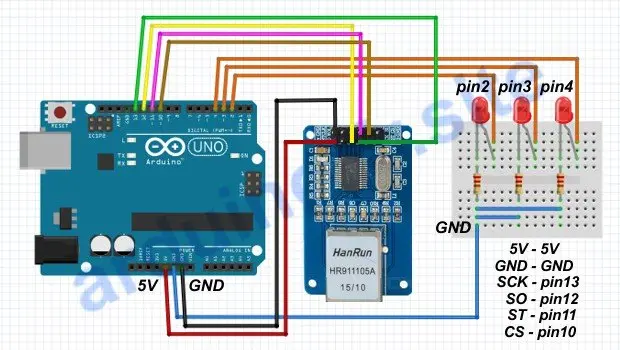
| ENC28J60 | Arduino Uno | Arduino Nano | Arduino Mega |
| GND | GND | GND | GND |
| 5V / 3.3V | 5V / 3.3V | 5V / 3.3V | 5V / 3.3V |
| SCK | 13 (SCK) | 13 (SCK) | 52 (SCK) |
| SO | 12 (MISO) | 12 (MISO) | 50 (MISO) |
| ST | 11(MOSI) | 11 (MOSI) | 51 (MOSI) |
| CS | 10 (SS) | 10 (SS) | 53 (SS) |
Dopo aver assemblato lo schema elettrico, è necessario caricare la libreria ENC28J60. Le librerie vengono utilizzate per semplificare il codice. Possono essere driver per l’hardware aggiuntivo o per le funzioni più utilizzate. Arduino IDE dispone già di una serie di librerie standard. Nel nostro caso, però, dobbiamo caricare una nuova libreria: EtherCard.h. Dopo aver assemblato il circuito, caricare il seguente sketch nel microcontrollore Uno.
Programma Arduino per utilizzare modulo HanRun ENC28J60
#include "EtherCard.h"

static byte mymac[] = {0x5A, 0x5A, 0x5A, 0x5A, 0x5A, 0x5A }; // MAC Address
static byte myip[] = {192, 168, 1, 55 }; // IP Address de la page
byte Ethernet::buffer[1200]; BufferFiller bfill;

int LedPins[] = {2, 3, 4, 5, 6, 7, 8, 9};
boolean PinStatus[] = {1, 2, 3, 4, 5, 6, 7, 8};

const char http_OK[] PROGMEM =
  "HTTP/1.0 200 OK\r\n"
  "Content-Type: text/html\r\n"
  "Pragma: no-cache\r\n\r\n";

const char http_Found[] PROGMEM =
  "HTTP/1.0 302 Found\r\n"
  "Location: /\r\n\r\n";

const char http_Unauthorized[] PROGMEM =
  "HTTP/1.0 401 Unauthorized\r\n"
  "Content-Type: text/html\r\n\r\n"
  "<h1>401 Unauthorized</h1>";

void homePage() {
  bfill.emit_p(PSTR("$F"
  "<meta http-equiv='Content-Type' content='text/html; charset=utf-8'>"
  "<meta name='viewport' content='width=device-width, initial-scale=1.0'>"
  "<title>Contrôle Arduino via Wi-Fi</title>"
  "<h1 style='color:#0ea6f2'>Contrôle Arduino via Wi-Fi</h1>"
  "<font size='3em'>"
  "<font style='display:none;'>LED 0: <a href='?ArduinoPIN1=$F'>$F</a></font>"
  "LED 1: <a href='?ArduinoPIN2=$F'>$F</a><br /><br />"
  "LED 2: <a href='?ArduinoPIN3=$F'>$F</a><br /><br />"
  "LED 3: <a href='?ArduinoPIN4=$F'>$F</a><br /><br />"
  "</font>"),

  http_OK,
  PinStatus[1] ? PSTR("off") : PSTR("on"),
  PinStatus[1] ? PSTR("<font color='green'>ON</font>") : PSTR("<font color='red'>OFF</font>"),
  PinStatus[2] ? PSTR("off") : PSTR("on"),
  PinStatus[2] ? PSTR("<font color='green'>ON</font>") : PSTR("<font color='red'>OFF</font>"),
  PinStatus[3] ? PSTR("off") : PSTR("on"),
  PinStatus[3] ? PSTR("<font color='green'>ON</font>") : PSTR("<font color='red'>OFF</font>"),
  PinStatus[4] ? PSTR("off") : PSTR("on"),
  PinStatus[4] ? PSTR("<font color='green'>ON</font>") : PSTR("<font color='red'>OFF</font>"));
}

void setup() {
  Serial.begin(9600);

  if (ether.begin(sizeof Ethernet::buffer, mymac, 10) == 0);
  if (!ether.dhcpSetup());

  ether.printIp("My Router IP: ", ether.myip);
  ether.staticSetup(myip);
  ether.printIp("My SET IP: ", ether.myip);

  for (int i = 2; i <= 5; i++) {
    pinMode(LedPins[i], OUTPUT);
    PinStatus[i] = false;
  }
}

void loop() {
  delay(1);
  word len = ether.packetReceive();
  word pos = ether.packetLoop(len);

  if (pos) {
    bfill = ether.tcpOffset();
    char *data = (char *) Ethernet::buffer + pos;
    if (strncmp("GET /", data, 5) != 0) {
      bfill.emit_p(http_Unauthorized);
    }
    else {
      data += 5;
      if (data[0] == ' ') {
        homePage();
        for (int i = 2; i <= 5; i++) { digitalWrite(LedPins[i], PinStatus[i + 1]); }
      }

      // "16" = il numero di caratteri della stringa "?ArduinoPIN1=on "
      else if (strncmp("?ArduinoPIN1=on ", data, 16) == 0) {
        PinStatus[1] = true;
        bfill.emit_p(http_Found);
      }
      else if (strncmp("?ArduinoPIN2=on ", data, 16) == 0) {
        PinStatus[2] = true;
        bfill.emit_p(http_Found);
      }
      else if (strncmp("?ArduinoPIN3=on ", data, 16) == 0) {
        PinStatus[3] = true;
        bfill.emit_p(http_Found);
      }
      else if (strncmp("?ArduinoPIN4=on ", data, 16) == 0) {
        PinStatus[4] = true;
        bfill.emit_p(http_Found);
      }

      // "17" = il numero di caratteri della stringa "?ArduinoPIN1=off "
      else if (strncmp("?ArduinoPIN1=off ", data, 17) == 0) {
        PinStatus[1] = false;
        bfill.emit_p(http_Found);
      }
      else if (strncmp("?ArduinoPIN2=off ", data, 17) == 0) {
        PinStatus[2] = false;
        bfill.emit_p(http_Found);
      }
      else if (strncmp("?ArduinoPIN3=off ", data, 17) == 0) {
        PinStatus[3] = false;
        bfill.emit_p(http_Found);
      }
      else if (strncmp("?ArduinoPIN4=off ", data, 17) == 0) {
        PinStatus[4] = false;
        bfill.emit_p(http_Found);
      }

      else { bfill.emit_p(http_Unauthorized); }
    }
    ether.httpServerReply(bfill.position());
  }
}
Spiegazione del codice per utilizzare modulo HanRun ENC28J60 Arduino:
- nel comando byte Ethernet::buffer[1200]; abbiamo liberato memoria nel microcontrollore per gli appunti. Quando aumenteremo la quantità di dati nella pagina web, dovremo aumentare la memoria del buffer per evitare blocchi;
- LED si accendono / spengono a seconda del numero di caratteri della stringa – ArduinoPIN4=on o ArduinoPIN1=off.
Conclusione. L’IP del microcontrollore Arduino nella rete locale è specificato nel codice. Tutte le funzioni di base sono descritte nel software, quindi non dovreste avere problemi a configurarlo. Andate all’indirizzo IP 192.168.1.55 tramite il computer o il telefono: dovreste vedere la pagina web. Se il modulo HanRun HR911105A / ENC28J60 non si collega, è necessario controllare le impostazioni del router WiFi.






Lascia un commento